Adding transactions to iCash is certainly something you will do very often.
It is a boring and repetitive task but, are you sure you are using the software to its full potential?
Actually, iCash can help you a lot with that as well!
Transactions are the basis for moving money between accounts. You have to input your stuff the best as you can since everything depends on the quality and the accuracy of the data you enter.
Reports and charts are as good as the data you type. Queries return as much information as what you have added in the first place.
Above all, take your time, check the data you type, add as much information as you, and take advantage of all the great iCash features.
Adding transactions to iCash can be done in many ways but did you know iCash also assists you in order to get it done faster and better?
This post shows you how to optimize data input by using the iCash built-in functions, enjoy!
Transaction input fields autocompletion

Autocompletion is a feature in which iCash predicts the rest of a word you are typing. All text fields in the transaction input panel support autocompletion.
Autocompletion greatly speeds up your interactions with iCash. It predicts the word you intend to enter after only a few characters have been typed into a text input field.
It works this way, you press a key, the text autocompletes. If it is OK you just press the tab key to accept the suggestion. Enter more text otherwise. You do that until the text autocompletes the way you want.
Alternatively, you can press ▼ at any point and try any of the other autocompletion predictions (and ▲ to go back in the list).
You can get the list of predictions by pressing Command-▼ on macOS or Control-▼ on Windows.
You can even get the full list with Shift-Command-▼ on macOS or Shift-Control-▼ on Windows, select an entry with ► and press return to select it.
The idea is not to leave the keyboard. You can always click on ► to see the full list of choices, not only the ones that start with what you have typed. You can also right-click on that same location in order to create a new entry or in the case of accounts, to get them displayed organized by types and categories.
Handy when you don’t remember a given account name or what category it belongs to.
By right-clicking, you can also get access to the menus to create accounts, edit transaction types, payees, comments, and projects.
Adding transactions to iCash uisng autocompletion
![]()
Transaction autocompletion is another feature in which iCash predicts a transaction based on previous transactions. It works with the Origin account, the Target account, and the Payee field.
Note that this feature can be deactivated from the iCash preferences. Nevertheless, transaction auto-completion greatly speeds up and expedites your interactions with iCash as it predicts the transaction with very little information.
It works this way:
Select the ‘Day’ field (press the tab key if needed), enter the day manually or by using ▲ or ▼.
Since you know you already entered a similar transaction before you can skip the ‘Transaction Type’ field by pressing the tab key twice.
Just enter/select an origin account, press the tab key and/or enter/select a target account and/or enter or select a Payee.
Now, as soon as you press the tab key again, all the other fields autocomplete. You can then accept or change the amount and the comment.
Try to enter a transaction just by typing or selecting a Payee and pressing the tab key. We know of users entering most of their transactions that way.
Amount calculator
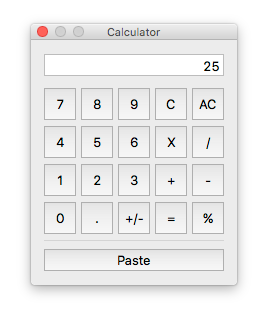
Select the amount field, enter for example 25 and then press the ‘+’ key (or any operator key). The iCash calculator appears. You can continue using your keyboard to complete the calculation.
Press the ‘Enter’ or the ‘=’ keys to get the result and the ‘Return’ key to close the calculator and get the result in the amount field.
Note that if you open the calculator per error or you have changed your mind, press the Space bar to close it ignoring the calculations. Press the escape key to reset the calculator (AC).
Predetermined Origin Account
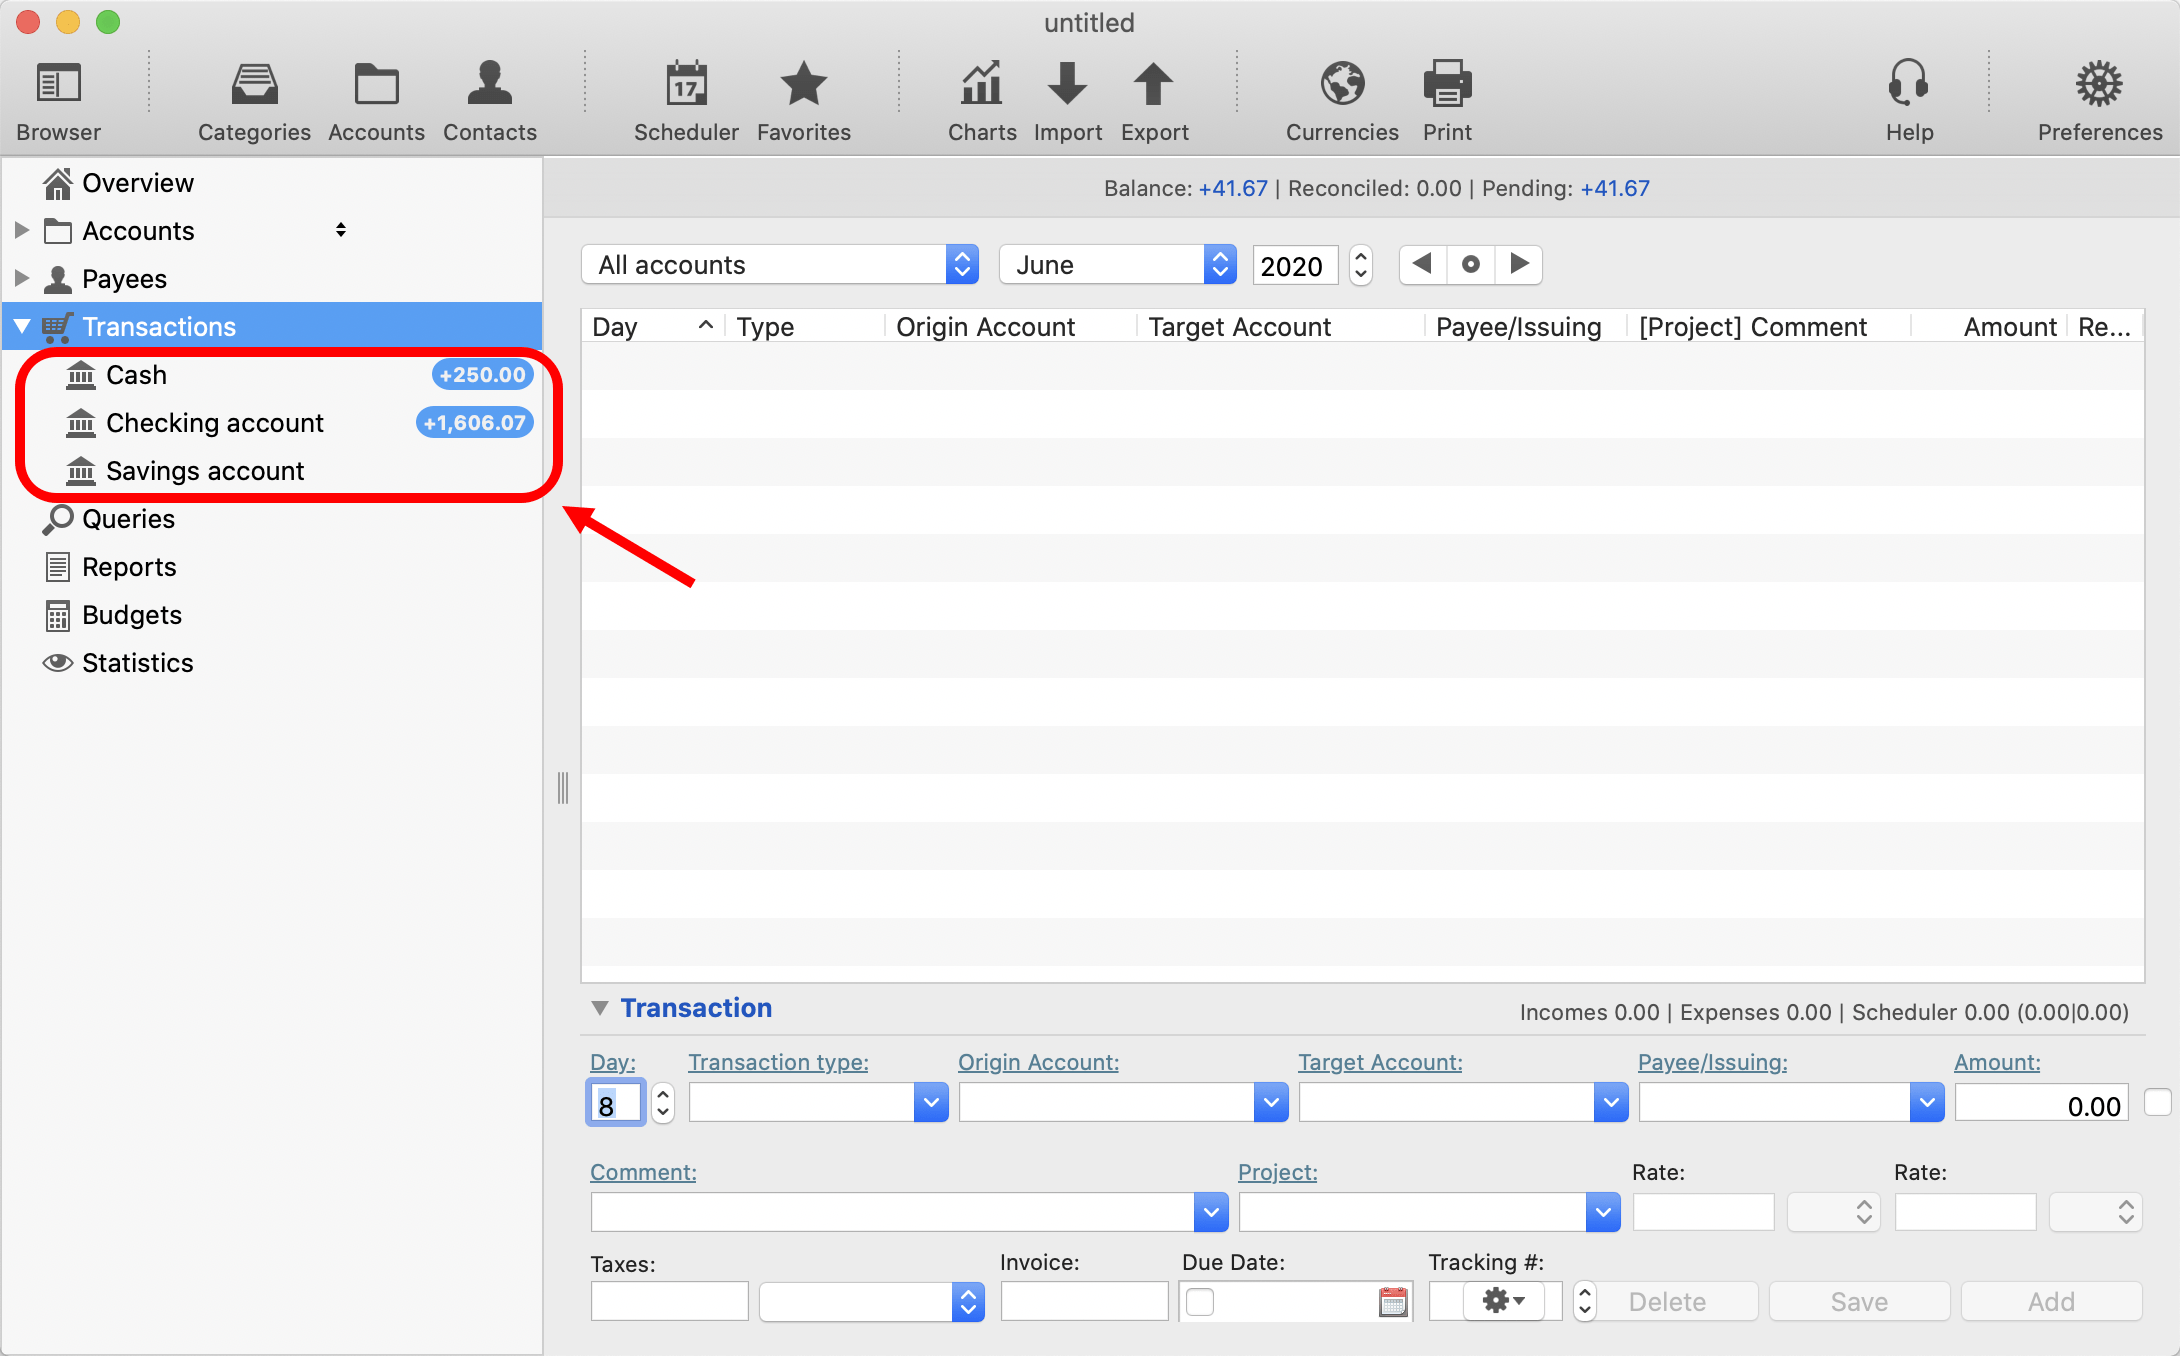
There are times when you have to enter a lot of transactions and the ‘Origin Account’ is always the same.
You can set a predetermined Origin Account by selecting a Bank account from the list on the left, under ‘Transactions’ (expand the ‘Transactions’ folder if you can’t see your bank accounts).
If you select an account there the ‘Origin Account’ will be always set to that account by default.
Click on the ‘Clear’ button or on an empty line in the transaction list to reset the transaction input panel with this new setting.
Adding transactions to iCash using previous transactions
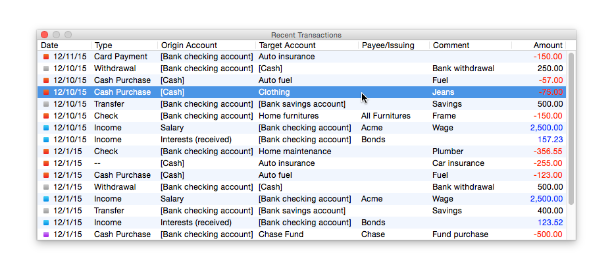
From given fields, especially the Day, Transaction Type, Origin Account, Target Account, Payee, Comment, and Project fields, you can get a list of previous transactions just pressing Command-◄ or Command-►.
You will get a list of all recent transactions or a list of recent transactions using the current field selection respectively.
It means you can get a list of recent transactions using the selection of the current field Command-► (same as clicking on the field label) or a list of recent transactions whatever the selection of the current field is with Command-◄.
This is handy when you are unsure of how you entered a similar transaction in the past.
Using the calendar
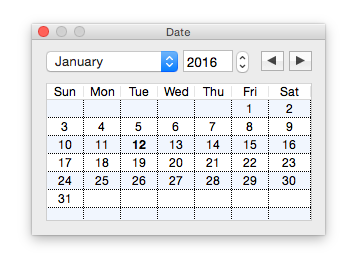
When on the Day field you can access a calendar just press Command-▼ on macOS or Ctrl-▼ on Windows or clicking on the label above.
If you select a date outside of the current transaction panel date it will adjust automatically.
Adding transactions to iCash using the saved favorites
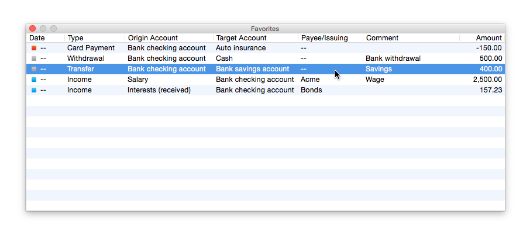
Again, from given fields, especially the Day, Transaction Type, Origin Account, Target Account, Payee, Comment, and Project fields, you can access the favorite list. Just press Command-▲.
You can add favorites to this list either by selecting an existing transaction and using the ‘Transaction > Add to Favorites’ menu, by right-clicking on your mouse and using the same menu, or by pressing Shift-Command-F on macOS or Shift-Control-F on Windows.
Adding transactions to iCash using last transaction(s)

When in the Day field you can press the ‘Space’ key and get all the transaction input fields filled with the data of the transaction you last added.
To say the truth, this feature is really handy when you have to enter the same transaction several times and only the amount is different.
The cursor is automatically moved to the amount field, you can then edit the amount or use ▲, and ▼ to navigate thru the previous transactions.
Duplicating existing transactions
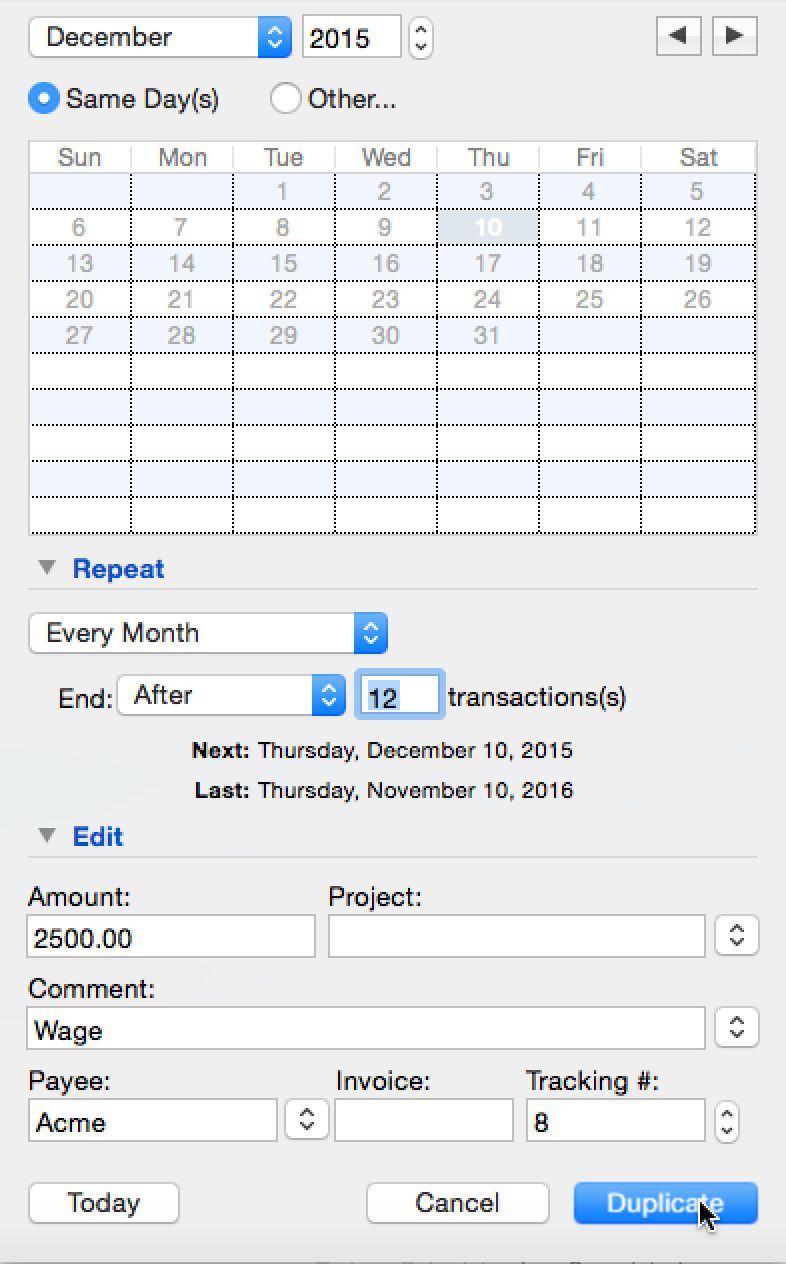
Finally, you can always duplicate exiting transactions using the Transaction > Duplicate menu (or right-clicking on a transaction and selecting ‘Duplicate’), one or several at a time. You can even repeat a transaction at a given time interval.
Inserting Emojis
There are places in iCash, given fields where you can add Emojis. The transaction comment for example. I recommend you have a look at the video below at minute 24:20 where I explain in detail how to do it on both macOS and MS Windows.
In summary:
– On macOS, you can reveal the Emoji window with Control + Command + Space
– and on Windows with Windows + ; OR Windows + .
How to swap the origin and target account
When entering a new transaction or modifying an existing one you can easily swap the origin and the target accounts by using the tool button and the ‘Swap Accounts’ menu this way:

Now some videos to see all those tricks in detail
In English – How to add transactions to iCash fast:
En Français – Comment saisir des opérations plus rapidement sur iCash:
En Español – Como añadir transacciones rapidamente en iCash:
Hope this post has been useful for you, feel free to comment on this post below!