How to send custom attachments with MaxBulk Mailer? Well, it turns out that one of the little known features of MaxBulk Mailer is the possibility to send custom attachments.
For instance, let’s imagine we have a list of 100 student’s father’s email addresses and we need to send their kid’s report cards.
We have the 100 PDF documents in a folder, each with a unique title. We need to send each one to the corresponding email address!
How to send custom attachments
With old MaxBulk Mailer versions, the only way to send custom attachments was by adding the 100 files to the attachment panel and using a long and complex conditional statement.
With generic mail software literally you have to send the messages manually, one by one.
To fully meet the requirement a specific feature was needed. We simply called it “custom attachments”.
The idea was not only to provide a way to perform such type of delivery but to make it as simple as possible.
The attachment panel
For the occasion, the attachment panel was redesigned and simplified.
We only have a list box with a ‘+’ icon in it (and a splitter bar right below to set its height).
To add an attachment you just click on the ‘+’ button and select a file. You can also drag and drop the file to the list as usual.
After adding a file to the list you will see a double arrow icon on the left of the attachment icon. If you click on that double arrow icon you will see a menu.
This menu allows you to replace the file name by something else like [Opt1].pdf.

Then on the recipient list add the file names, without the extension in the Opt1 column.
If you want to add the full name with the extension then edit the attachment name and set it to [Opt1] only.
Finally, if your attachment is a picture (png, jpg, gif) you can even place it in the message by dragging and dropping the file from the attachment list to the message.
Attachment tags also support a default value, the format is [tag_name|default_value] like for example [Opt1|generic].pdf. That means ‘generic.pdf’ will be sent when the Opt1 tag has not been set.
In addition, you can use any common tag, opt tags, date tags, or whatever… even a combination of them!
Go to the Preview panel, there is a new ‘attachments’ line below the header lines. Try and see yourself!
In conclusion, it is now very easy to send custom attachments.
How does it work
MaxBulk Mailer simply replaces the tags inside the attachment names with the data in the corresponding list columns.
Tags are simply data placeholders. They can be anything from columns names, date strings, delivery date, or a number sequence.
The only requirement is to name your attachments in a way MaxBulk Mailer can then handle them.
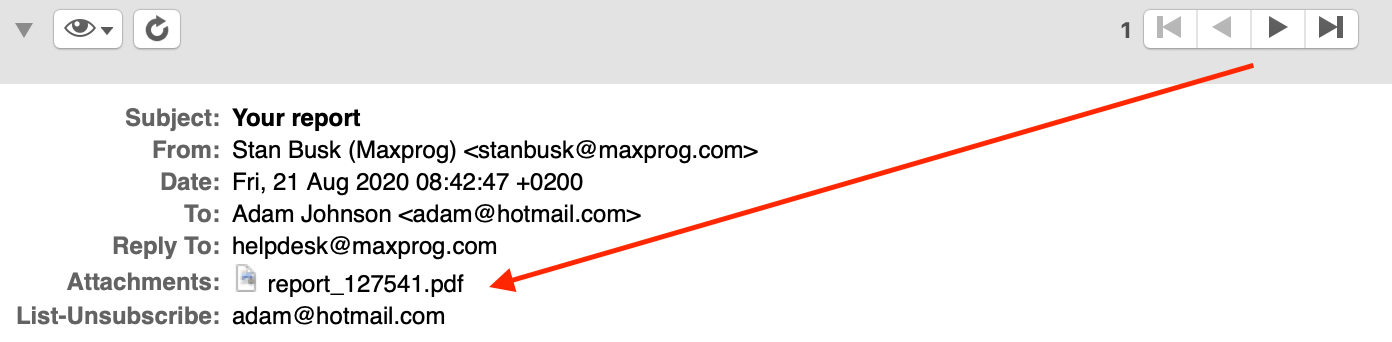
In the example above the 100 PDF files could be named ‘report_127541.pdf’, ‘report_854225.pdf’, ‘report_995674.pdf’, and so on. We could use ‘report_[Opt1].pdf’ as the attachment name and then place the ‘127541’, ‘854225’, ‘995674’ IDs in the Opt1 column.
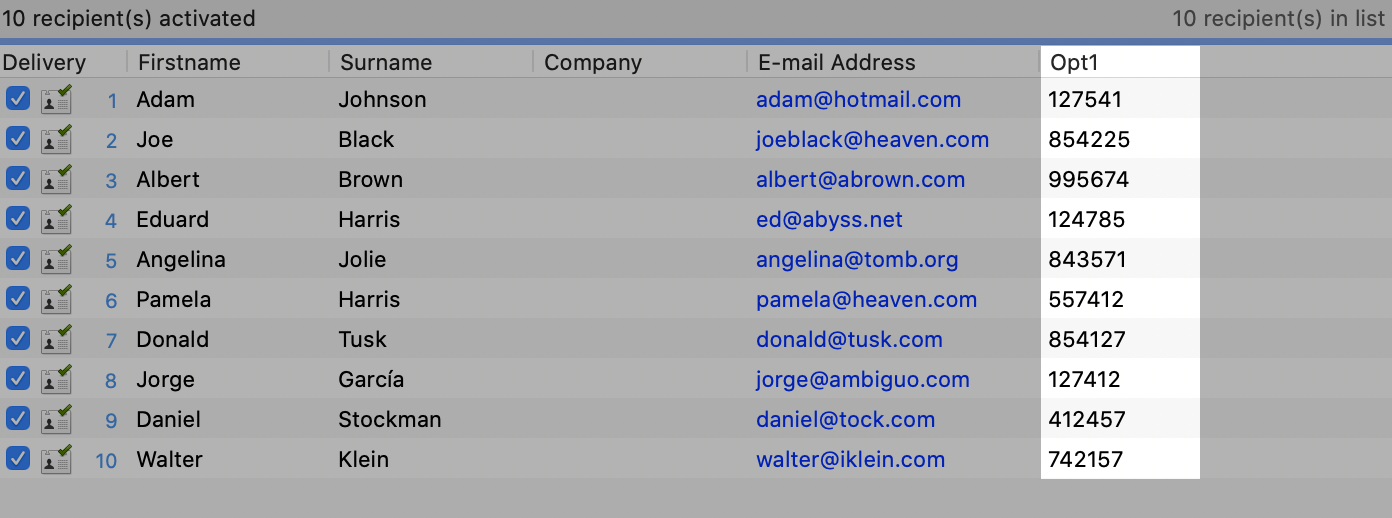
Then MaxBulk Mailer would send ‘report_124571.pdf’, ‘report_887124.pdf’, ‘report_741458.pdf’, and so on to the corresponding recipients in the list.
In this video, I use the example above:
Any comment/suggestion/feedback is welcome!